六、Spring与Web
六、Spring与Web
这一节将使用 Spring 容器与 Jsp 相结合,首先确认 JSP 的作用。
三层架构中,JSP 处于 View 层,用户都是在这层与程序交互。而 Service 层与 Dao 层,之前所学的内容都是用户接触不到的,用于处理用户在 View 层的操作,代码是放在 src 包里。
我们将实现注册用户的功能:在页面输入姓名和年龄,然后插入到数据库中。
6.1 定义页面和Servlet
第一步先定义输入页面,新建 JSP 文件,命名为 index.jsp。
<body>
	<form action="registerServlet" method="post">
		姓名:<input type="text" name="name"/><br/>
		年龄:<input type="text" name="age"/><br/>
		<input type="submit" value="注册"/>
	</form>
</body>
第二步定义 Servlet,命名为 RegisterServlet.java。
- 第 1 行,将连接网址从 RegisterServlet 改为 registerServlet;
- 第 6 行,经典设置 UTF-8 格式;
- 第 7 和 8 行,接收 JSP 传过来的参数;
- 第 9 行,因为从 JSP 接收的数据都是字符串类型,所以需要将年龄转为整型;字符串转为整形有两种方法:
- Integer.valueOf() 方法,返回值为 Integer,本例用的是这个;
- Integer.parseInt() 方法,返回值为 int;
- 第 12 行,进行页面跳转。
@WebServlet("/registerServlet")
public class RegisterServlet extends HttpServlet {
	private static final long serialVersionUID = 1L;

	protected void doGet(HttpServletRequest request, HttpServletResponse response) throws ServletException, IOException {
		request.setCharacterEncoding("utf-8");
		String name = request.getParameter("name");
		String ageStr = request.getParameter("age");
		Integer age = Integer.valueOf(ageStr);
		Student student = new Student(name, age);
        // 待补充的代码
		request.getRequestDispatcher("/welcome.jsp").forward(request, response);
	}

	protected void doPost(HttpServletRequest request, HttpServletResponse response) throws ServletException, IOException {
		// TODO Auto-generated method stub
		doGet(request, response);
	}
}
6.2 搭建环境
复制 08-spring-mybatis 中的 service 包和 dao 包,以及其全部 Jar 包。
这时思考下,我们需要操作 Service 层就需要获取到 Spring 容器。
待补充的代码如下:顺便我这里插入了输出 ApplicationContext 对象的语句。
Student student = new Student(name, age);
// 待补充的代码
ApplicationContext ac = new ClassPathXmlApplicationContext("applicationContext.xml");
IStudentService service = (IStudentService) ac.getBean("studentService");
service.addStudent(student);
//输出ApplicationContext对象进行测试
System.out.println(ac);
6.3 进行测试
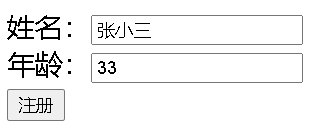
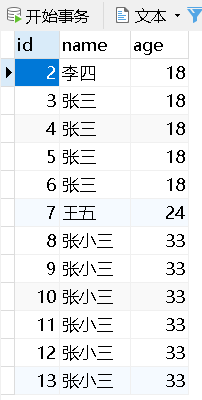
- 在文本框姓名输入 " 张小三 ",年龄输入 " 33 ";
- 提交后反复刷新几次;
- 查看数据库的信息,发现刷新的几次都成功地插入;
- 然后查看控制台输出

- 发现其中的问题:每一次提交都创建了一个新的 Spring 容器。
6.4 问题分析及解决
Spring 容器里我们都会存放大量的 bean 对象。从之前学过的知识可知,每一次创建 Spring 容器时,Spring 就会将所有的 bean 全部初始化一遍。
这样不仅占用内存和时间,而且会将 bean 里的内容全部重置,这是我们不希望看到的。
现在我们是把获取容器放到 doPost 或者 doGet 方法里,这两个方法每一次访问 Servlet 就会执行一次;
问: 那把它放到 init() 方法里,init() 方法当实例化一个 Servlet 时只会执行一次,如何?
答: 不行,当有多个 Servlet 时,每个都会执行不同的 init() 方法 ,就会创建多个容器。
我们想要加载 Spring 容器的时间点是 当整个 Web 应用启动时 同时加载 Spring 容器。
而 Web 应用启动时,会初始化 ServletContext 对象,该对象整个 Web 应用 只会初始化一次,所以可以将 Spring 容器创建与 ServletContext 对象捆绑在一起。
正好有 ContextLoaderListener 对象,来监听 ServletContext 对象,可以准确捕获到其初始化这个时间点。创建 Spring 容器后需要放到 **域对象属性 **里(域对象属性在整个 Web 应用都能获取到)。
6.5 ContextLoaderListener 源码分析
6.5.1 ContextLoaderListener 源码
ContextLoaderListener.class: 由于我们需要跟踪初始化 context 的方法即可,第 7 行调用了 initWebApplicationContext 方法,这个方法是其父类的继承下的方法,所以跟到父类的源码。
public class ContextLoaderListener extends ContextLoader implements ServletContextListener {
    /**
	 * Initialize the root web application context.
	 */
	@Override
	public void contextInitialized(ServletContextEvent event) {
		initWebApplicationContext(event.getServletContext());
	}
}
ContextLoader.class:
- 第 2 行,可知该方法先从 servletContext 域对象判断属性 “ WebApplicationContext.ROOT_WEB_APPLICATION_CONTEXT_ATTRIBUTE ” 是否为空,若不为空,则抛出异常。
- 第 35 行,将上述对象放到 servletContext 域对象属性中。
public WebApplicationContext initWebApplicationContext(ServletContext servletContext) {
		if (servletContext.getAttribute(WebApplicationContext.ROOT_WEB_APPLICATION_CONTEXT_ATTRIBUTE) != null) {
			throw new IllegalStateException(
					"Cannot initialize context because there is already a root application context present - " +
					"check whether you have multiple ContextLoader* definitions in your web.xml!");
		}

		Log logger = LogFactory.getLog(ContextLoader.class);
		servletContext.log("Initializing Spring root WebApplicationContext");
		if (logger.isInfoEnabled()) {
			logger.info("Root WebApplicationContext: initialization started");
		}
		long startTime = System.currentTimeMillis();

		try {
			// Store context in local instance variable, to guarantee that
			// it is available on ServletContext shutdown.
			if (this.context == null) {
				this.context = createWebApplicationContext(servletContext);
			}
			if (this.context instanceof ConfigurableWebApplicationContext) {
				ConfigurableWebApplicationContext cwac = (ConfigurableWebApplicationContext) this.context;
				if (!cwac.isActive()) {
					// The context has not yet been refreshed -> provide services such as
					// setting the parent context, setting the application context id, etc
					if (cwac.getParent() == null) {
						// The context instance was injected without an explicit parent ->
						// determine parent for root web application context, if any.
						ApplicationContext parent = loadParentContext(servletContext);
						cwac.setParent(parent);
					}
					configureAndRefreshWebApplicationContext(cwac, servletContext);
				}
			}
			servletContext.setAttribute(WebApplicationContext.ROOT_WEB_APPLICATION_CONTEXT_ATTRIBUTE, this.context);

			ClassLoader ccl = Thread.currentThread().getContextClassLoader();
			if (ccl == ContextLoader.class.getClassLoader()) {
				currentContext = this.context;
			}
			else if (ccl != null) {
				currentContextPerThread.put(ccl, this.context);
			}

			if (logger.isDebugEnabled()) {
				logger.debug("Published root WebApplicationContext as ServletContext attribute with name [" +
						WebApplicationContext.ROOT_WEB_APPLICATION_CONTEXT_ATTRIBUTE + "]");
			}
			if (logger.isInfoEnabled()) {
				long elapsedTime = System.currentTimeMillis() - startTime;
				logger.info("Root WebApplicationContext: initialization completed in " + elapsedTime + " ms");
			}

			return this.context;
		}
		// ...
	}
6.5.2 注册ServletContext监听器
ServletContext 监听器需要在 web.xml 注册才可以使用。在 web.xml 添加如下代码。
注册 ServletContext 监听器完成两件工作:
- 在 ServletContext 被创建时,创建 Spring 容器对象;
- 将创建好的 Spring 容器对象放入到 ServletContext 的域属性空间。
<listener>
 	<listener-class>org.springframework.web.context.ContextLoaderListener</listener-class>
 </listener>
需要注意的是,在 ContextLoader.class 的源码中的注释:
- 第 7 ~ 8 行注释:说的是加载 Spring 的 applicationContext.xml 的文件时,若没有指定,则默认寻找 /WebContent/WEB-INF/applicationContext.xml 位置的文件。
- 第 1 行注释:说的是 web.xml 的 <context-param/> 标签的 contextConfigLocation 属性会和 java 代码里的常量 CONFIG_LOCATION_PARAM 链接到一起。
/* <p>Processes a {@link #CONFIG_LOCATION_PARAM "contextConfigLocation"} context-param
* and passes its value to the context instance, parsing it into potentially multiple
* file paths which can be separated by any number of commas and spaces, e.g.
* "WEB-INF/applicationContext1.xml, WEB-INF/applicationContext2.xml".
* Ant-style path patterns are supported as well, e.g.
* "WEB-INF/*Context.xml,WEB-INF/spring*.xml" or "WEB-INF/**/*Context.xml".
* If not explicitly specified, the context implementation is supposed to use a
* default location (with XmlWebApplicationContext: "/WEB-INF/applicationContext.xml").*/
而源码里有这几行,这几行说明了 ContextLoader 会将 CONFIG_LOCATION_PARAM 常量的值作为 configLocation 配置文件位置。所以在 web.xml 可以配置 applicationContext.xml 的位置。
wac.setServletContext(sc);
String configLocationParam = sc.getInitParameter(CONFIG_LOCATION_PARAM);
if (configLocationParam != null) {
    wac.setConfigLocation(configLocationParam);
}
在 web.xml 添加如下代码即可:
<!-- 指定Spring配置文件的位置及名称 -->
<context-param>
    <param-name>contextConfigLocation</param-name>
    <param-value>classpath:applicationContext.xml</param-value>
</context-param>
6.5.3 修改获取容器的方式
根据上面 6.5.1 源码可知,ContextLoader 会将 Spring 存到域对象属性里,所以直接获取域对象属性即可。
String acKey = WebApplicationContext.ROOT_WEB_APPLICATION_CONTEXT_ATTRIBUTE;
ApplicationContext ac = (ApplicationContext) this.getServletContext().getAttribute(acKey);
//插入输出ApplicationContext进行测试
System.out.println(ac);
6.5.4 运行结果
运行结果如下,可知每次运行只会使用最初创建的容器

6.5.5 使用工具类来获取Spring容器
看到 6.5.3 代码的第一行,获取域对象属性需要输入其属性名,而属性名太长不易记忆。
所以可以使用工具类来获取 Spring 容器,不需要再记忆再一长串的字符。
改为如下代码:
/* String acKey = WebApplicationContext.ROOT_WEB_APPLICATION_CONTEXT_ATTRIBUTE;
ApplicationContext ac = (ApplicationContext) this.getServletContext().getAttribute(acKey);*/
WebApplicationContext ac = WebApplicationContextUtils.getRequiredWebApplicationContext(getServletContext());
我们去看下源码来探究下其是如何从域对象获取到需要的属性的:
- 第 1 ~ 7 行是 getRequiredWebApplicationContext 方法,其里面的代码将 ServletContext 对象传入到 getWebApplicationContext 方法里。
- 第 9 ~ 11 行是 getWebApplicationContext 方法,其里面调用了重载的另一个方法,其中一个参数是我们所需要输入的域对象的属性名,这里就帮我们输入了属性名。
- 第 13 ~ 32 行是被调用的方法,第 15 行利用传进来的属性名来调用 getAttribute 方法获取到 Spring 容器对象。
public static WebApplicationContext getRequiredWebApplicationContext(ServletContext sc) throws IllegalStateException {
    WebApplicationContext wac = getWebApplicationContext(sc);
    if (wac == null) {
        throw new IllegalStateException("No WebApplicationContext found: no ContextLoaderListener registered?");
    }
    return wac;
}

public static WebApplicationContext getWebApplicationContext(ServletContext sc) {
	return getWebApplicationContext(sc, WebApplicationContext.ROOT_WEB_APPLICATION_CONTEXT_ATTRIBUTE);
}

public static WebApplicationContext getWebApplicationContext(ServletContext sc, String attrName) {
    Assert.notNull(sc, "ServletContext must not be null");
    Object attr = sc.getAttribute(attrName);
    if (attr == null) {
        return null;
    }
    if (attr instanceof RuntimeException) {
        throw (RuntimeException) attr;
    }
    if (attr instanceof Error) {
        throw (Error) attr;
    }
    if (attr instanceof Exception) {
        throw new IllegalStateException((Exception) attr);
    }
    if (!(attr instanceof WebApplicationContext)) {
        throw new IllegalStateException("Context attribute is not of type WebApplicationContext: " + attr);
    }
    return (WebApplicationContext) attr;
}