一、MyBatis入门
一、MyBatis入门
1.1 MyBatis 的下载
MyBatis 可以在 Github 官网下载:[ https://github.com/mybatis/mybatis-3 ]
1.2 MyBatis 概述
1.2.1 MyBatis 简介
MyBatis是一个优秀的基于Java的持久层框架,它内部封装了JDBC,使开发者 只需关注SQL语句本身 ,而不用再花费精力去处理诸如注册驱动、创建 Connection 、配置 Statement 等繁杂过程。
Mybatis通过 xml 或注解 的方式将要执行的各种statement(statement、preparedStatement 等)配置起来,并通过Java对象和Statement中SQL的动态参数进行映射生成最终执行的SQL语句,最后由MyBatis框架执行SQL并将结果映射成Java对象并返回。
1.2.2 MyBatis与Hibernate
Hibernate框架是提供了全面的数据库封装机制的 “ 全自动 ” ORM,即实现了 POJO 和数据库表之间的映射,以及 SQL 的 自动生成和执行 。
相对于此,MyBatis 只能算作是 “ 半自动 ” ORM。其着力点,是在 POJO 类与 SQL 语句之间的映射关系。也就是说,MyBatis 并不会为程序员自动生成 SQL 语句 。具体的 SQL 需要程序员自己编写,然后通过 SQL 语句映射文件,将 SQL 所需的参数,以及返回的结果字段映射到指定 POJO 。因此,MyBatis 成为了 “ 全自动 ” ORM的一种有益补充。
与Hibernate相比,MyBatis具有以下几个特点:
- 在XML文件中配置SQL语句,实现了SQL语句与代码的分离,给程序的维护带来了很大便利。
- 因为需要程序员自己去编写SQL语句,程序员可以结合数据库自身的特点灵活控制SQL语句,因此能够实现比Hibernate等全自动ORM框架更高的查询效率,能够完成复杂查询。
- 简单,易于学习,易于使用,上手快。
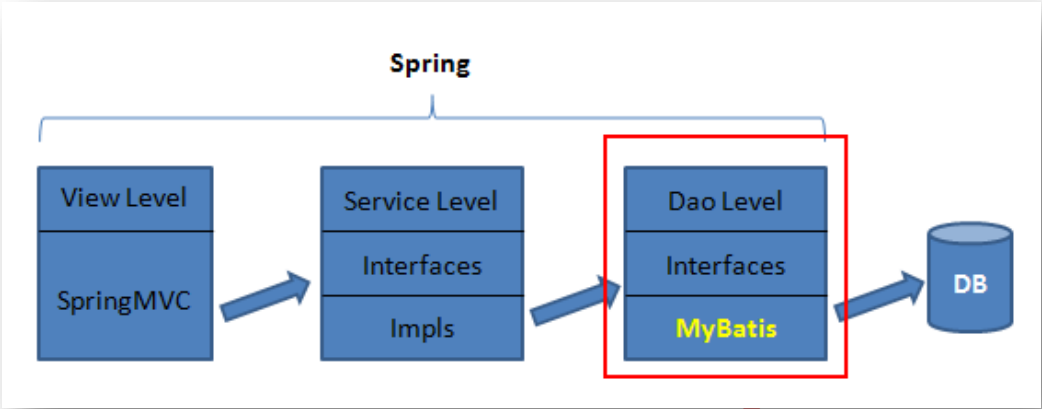
1.3 MyBatis 体系结构

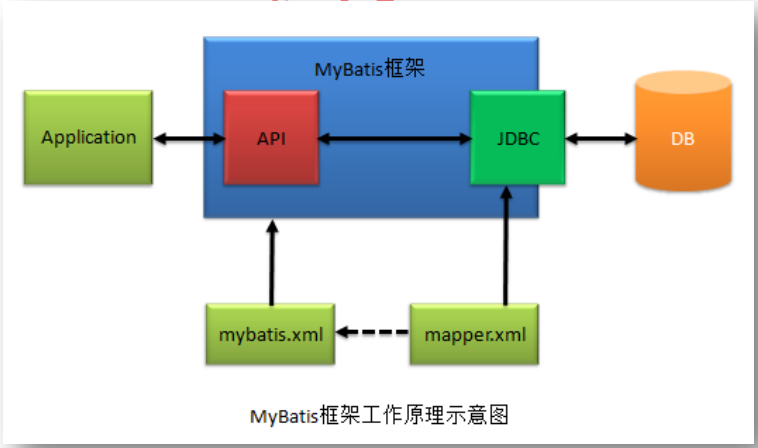
1.4 MyBatis工作原理
1.5 第一个 MyBatis 程序
需求:实现将 Student 信息写入到数据库里。
1.5.0 导入 Jar 包
- 导入下载好的 MyBatis 中的子文件夹 lib 里的全部 Jar 包和核心 Jar 包 mybatis-x.x.x.jar;
- 导入 mysql-connector-java-x.x.xx.jar
- 导入 hamcrest-core-1.3.jar(因为需要用到 log4j)
1.5.1 定义实体类 Student
Student.java
public class Student {
	public Integer id;
	public String name;
	public int age;
	public double scroe;

	// 有参和无参构造器
	// getter 和 setter
	// toString()
}
提示
id 属性的类型是 Integer,是为了便于判空;
成员变量 是类私有的,只要有了 getter 和 setter ,该成员变量就变成了 属性,对其他类公开。
1.5.2 在数据库里创建表
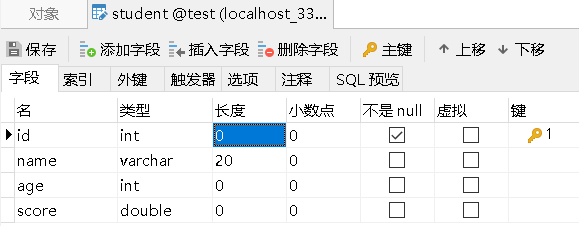
注意
在创建数据库表时,字段名要与属性名一致。(不一致时,需要用过 resultMap 解决)
1.5.3 定义 dao 接口
IStudentDao.java:定义 dao 接口,用于后面实现将学生信息插入数据库的操作。
public interface IStudentDao {
	void insertStudent(Student student);
}
1.5.4 定义映射文件
映射文件主要完成 Dao 层中 SQL 语句的映射。映射文件名随意,一般为 mapper.xml。
映射文件需要约束文件来解释,约束文件在 mybatis-x.x.x.jar 的 org.apache.ibatis.builder.xml 包里,如下图所示。
.png)
mapper.xml:而在映射文件中需要指定约束文件。
- namespace 属性为当前映射的名字;
- 因为执行插入操作,所以需要使用 <insert/> 标签;其属性 id 会在调用 sql 语句时使用;属性 parameterType 是传进 sql 语句的值的类型;然后可以使用 ” #{} “ 符号来取出 bean 里的属性。
<?xml version="1.0" encoding="UTF-8" ?>
<!DOCTYPE mapper
 PUBLIC "-//mybatis.org//DTD Mapper 3.0//EN"
 "http://mybatis.org/dtd/mybatis-3-mapper.dtd">
<mapper namespace="test">
	<insert id="insertStudent" parameterType="com.hahg.beans.Student">
		insert into student(name,age,score) values (#{name},#{age},#{score})
	</insert>
</mapper>
1.5.4 配置主配置文件
<settings/> 标签用于使用 Log4j2 日志输出技术
<environments/> 标签里可以有 多个 <environment/> 子标签,用于在多个环境里切换。该标签的 default 属性用于选择当前使用的环境配置。
<transactionManager/> 标签为事务管理器,其属性 type 若为 “ JDBC ” 则代表使用 JDBC 默认的事务管理;若为 “ Manager ” ,则代表使用第三方事务管理。
<dataSource/> 标签的 type 属性的值 “ POOLED ” 代表使用数据库连接池。
<property/> 标签用于配置连接数据库的四要素—— driver、url、username、password。
- url 的值中的 “ jdbc:mysql:///test …… ” ;三个 “ /// ” 是默认连接地址的缩写—— //127.0.0.1:3306/
- 其中的 “ & ” 连接字符需要使用 “ & " 来表示。
<?xml version="1.0" encoding="UTF-8" ?>
<!DOCTYPE configuration
PUBLIC "-//mybatis.org//DTD Config 3.0//EN"
"http://mybatis.org/dtd/mybatis-3-config.dtd">
<configuration>
<settings>
<setting name="logImpl" value="LOG4J2" />
</settings>
<environments default="development">
<environment id="development">
<transactionManager type="JDBC" />
<dataSource type="POOLED">
<property name="driver" value="com.mysql.cj.jdbc.Driver" />
<property name="url" value="jdbc:mysql:///test?useUnicode=true&characterEncoding=UTF-8&serverTimezone=UTC" />
<property name="username" value="root" />
<property name="password" value="password" />
</dataSource>
</environment>
</environments>
<mappers>
<mapper resource="com/hahg/dao/mapper.xml" />
</mappers>
</configuration>
1.5.5 定义 dao 接口的实现类
StudentDaoImpl.java:实现插入到数据库的操作。
- 第 9 行加载主配置文件;
- 第 11 行创建 SqlSessionFactory 对象;
- 第 13 行创建 SqlSession 对象;
- 第 15 行调用 insert() 方法执行插入操作,第一个参数为映射文件中执行语句的 id 名字,若有两个配置文件,且它们中有 id 名字一致时,需要在前面加上映射的名字例如, test.insertStudent ;第二个参数为需要插入的对象;
- 第 17 行调用 commit() 方法,提交插入请求。
public class StudentDaoImpl implements IStudentDao {

	private SqlSession sqlSession;

	@Override
	public void insertStudent(Student student) {
		try {
			// 1. 加载配置文件
			InputStream inputStream = Resources.getResourceAsStream("mybatis.xml");
			// 2. 创建SqlSessionFactory对象
			SqlSessionFactory sqlSessionFactory = new SqlSessionFactoryBuilder().build(inputStream);
			// 3. 创建SqlSession对象
			sqlSession = sqlSessionFactory.openSession();
			// 4. 执行相关操作
			sqlSession.insert("insertStudent", student);

			sqlSession.commit();
		} catch (IOException e) {
			// TODO Auto-generated catch block
			e.printStackTrace();
		}finally {
			if(sqlSession!=null) {
				sqlSession.close();
			}
		}
	}
}
1.5.6 定义测试类
MyTest.java:使用 junit 测试来运行方法。这里创建了实现类的对象和 Student 类的对象,并调用其中的 insertStudent(student) 方法。
public class MyTest {

	private IStudentDao dao;

	@Before
	public void before() {
		dao=new StudentDaoImpl();
	}

	@Test
	public void testInsert() {
		Student student = new Student("张三", 23, 93.5);
		dao.insertStudent(student);
	}
}
1.5.7 添加日志控制文件
log4j2.xml:新建该文件在 src 根目录下,并添加以下代码;本例的日志只需要在控制台输出,所以 <appenders/> 的子标签只有 <Console/> 标签。
<?xml version="1.0" encoding="UTF-8"?>

<configuration status="OFF">
	<appenders>
		<Console name="myConsole" target="SYSTEM_OUT">
			<PatternLayout pattern="[%-5p][%c %L] %m%n" />
		</Console>
	</appenders>

	<loggers>
		<root level="debug">
			<appender-ref ref="myConsole" />
		</root>
	</loggers>

</configuration>
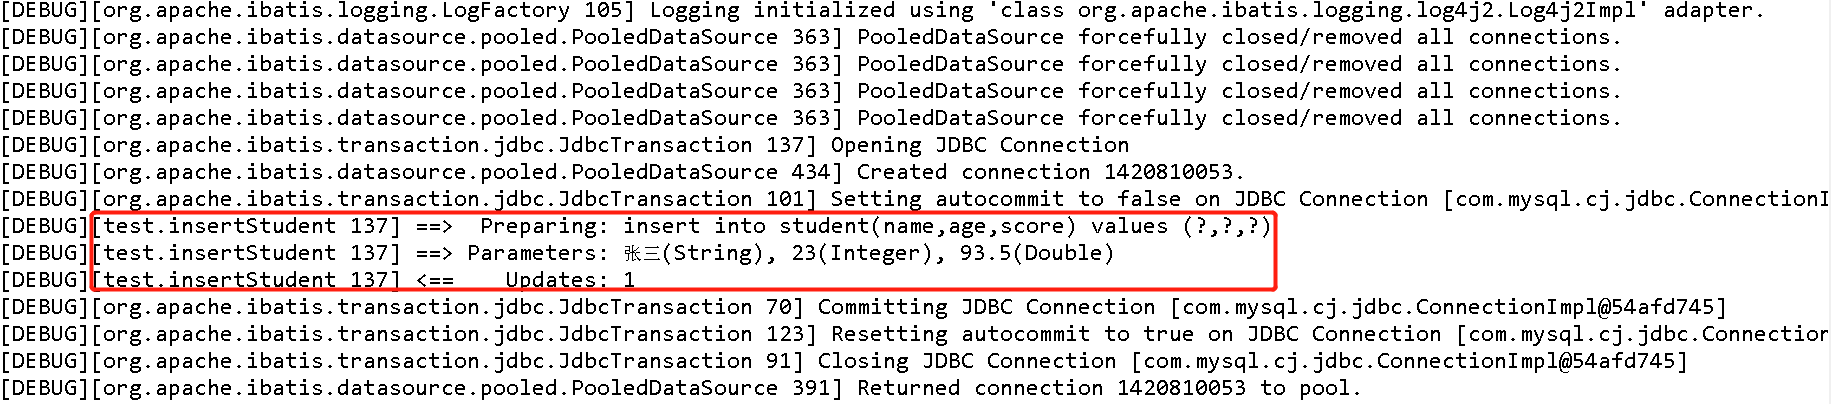
1.5.8 日志输出结果
1.6 使用工具类
由于每一次执行 SqlSession 的方法,均需首先获取到该对象。而 SqlSession 对象的获取比较繁琐,所以可以将获取 SqlSession 对象定义为一个工具类方法。
SqlSession 对象是通过 SqlSessionFactory 对象创建的。由于 SqlSessionFactory 类为重量级对象,创建和销毁都极耗费时间,且为线程安全的,所以可以将 SqlSessionFactory 对象定义为单例的。
线程安全的是指该对象的属性是不可以修改的,若有可修改的属性则线程不安全。
1.6.1 创建工具类
MyBatisUtils.java:因为 SqlSessionFactory 对象为单例的,所以将其设为类的静态成员变量,并在调用 getSqlSession() 方法时判断是否为空,若为空才进行创建。
public class MyBatisUtils {
	private static SqlSessionFactory sqlSessionFactory;

	public static SqlSession getSqlSession() {
		try {
			if (sqlSessionFactory==null) {
				InputStream inputStream = Resources.getResourceAsStream("mybatis.xml");
				sqlSessionFactory = new SqlSessionFactoryBuilder().build(inputStream);
			}
		} catch (IOException e) {
			e.printStackTrace();
		}
		return sqlSessionFactory.openSession();
	}
}
1.6.2 修改实现类
StudentDaoImpl.java:在实现类中直接调用工具类的静态方法获取 SqlSession 对象。
public class StudentDaoImpl implements IStudentDao {

	private SqlSession sqlSession;

	@Override
	public void insertStudent(Student student) {
		try {
			sqlSession=MyBatisUtils.getSqlSession();
			sqlSession.insert("insertStudent", student);

			sqlSession.commit();
		}finally {
			if(sqlSession!=null) {
				sqlSession.close();
			}
		}
	}
}
1.7 使用属性文件读取 DB 连接四要素
1.7.1 创建属性文件
在 src 的根目录下创建 jdbc.properties 属性文件,并将 DB 连接四要素写入文件。需要注意的是要将 “ & " 改为 ” & “。
jdbc.driver=com.mysql.cj.jdbc.Driver
jdbc.url=jdbc:mysql:///test?useUnicode=true&characterEncoding=UTF-8&serverTimezone=UTC
jdbc.user=root
jdbc.password=password
1.7.2 修改主配置文件
mybatis.xml:
- 第 7行,在 <setting/> 标签前加入 <properties/> 来注册配置文件;
- 第 18 至 21 行,在 <property/> 标签里的 value 属性,需要使用 ” ${ } “ 占位符来引用配置文件。
<?xml version="1.0" encoding="UTF-8" ?>
<!DOCTYPE configuration
 PUBLIC "-//mybatis.org//DTD Config 3.0//EN"
 "http://mybatis.org/dtd/mybatis-3-config.dtd">
<configuration>
	<!-- 注册配置文件 -->
	<properties resource="jdbc.properties" />

	<settings>
		<setting name="logImpl" value="LOG4J2" />
	</settings>

	<environments default="development">
		<environment id="development">
			<transactionManager type="JDBC" />
			<dataSource type="POOLED">
				<!-- 使用占位符来引用jdbc配置文件 -->
				<property name="driver" value="${jdbc.driver}" />
				<property name="url" value="${jdbc.url}" />
				<property name="username" value="${jdbc.user}" />
				<property name="password" value="${jdbc.password}" />
			</dataSource>
		</environment>
	</environments>
	<mappers>
		<mapper resource="com/hahg/dao/mapper.xml" />
	</mappers>
</configuration>
1.8 源码分析
1.8.1 输入流的关闭
提示
在查看的源码时,Alt + ← / → 可以切换源代码界面;Ctrl + PgUp 可以切换标签页
SqlSessionFactoryBuilder.class:之前使用
sqlSessionFactory = new SqlSessionFactoryBuilder().build(inputStream) 语句,
由下源码第 2 行可知,这个语句会调用 build( inputStream, null, null ) 三参数 方法。
public SqlSessionFactory build(InputStream inputStream) {
    return build(inputStream, null, null);
}
这时跟进其 bulid 方法源码查看其实现方式,在第 10 行代码自动关闭了输入流,所以在工具类使用输入流对象完毕后,不用手工进行关闭。
public SqlSessionFactory build(InputStream inputStream, String environment, Properties properties) {
    try {
      XMLConfigBuilder parser = new XMLConfigBuilder(inputStream, environment, properties);
      return build(parser.parse());
    } catch (Exception e) {
      throw ExceptionFactory.wrapException("Error building SqlSession.", e);
    } finally {
      ErrorContext.instance().reset();
      try {
        inputStream.close();
      } catch (IOException e) {
        // Intentionally ignore. Prefer previous error.
      }
    }
  }
1.8.2 SqlSession 的创建
之前使用了 sqlSessionFactory.openSession(); 这个语句。
SqlSession 对象的创建,需要使用 SqlSessionFactory 接口对象的 openSession() 方法。而 SqlSessionFactory 接口的实现类为 DefaultSqlSessionFactory。
这时跟进 DefaultSqlSessionFactory 源码。
DefaultSqlSessionFactory.class:下面为 openSession() 方法源码,可知在 openSession() 方法其调用了另一个 openSessionFromDataSource(configuration.getDefaultExecutorType(), null, false) 方法。
public class DefaultSqlSessionFactory implements SqlSessionFactory {

  @Override
  public SqlSession openSession() {
    return openSessionFromDataSource(configuration.getDefaultExecutorType(), null, false);
  }
跟进 openSessionFromDataSource 方法,发现其在同一个类,下面来分析源码:
- 第 4 行获取 environment 环境变量;
- 第 5 行根据 environment 变量来获取事务工厂对象 ;
- 第 6 行利用事务工厂对象来新建事务;
- 第 7 行使用配置文件对象来创建执行器对象,将来用于执行映射文件中的 SQL 语句;
- 第 8 行使用【 configuration 配置对象、executor 执行器对象、和是否自动提交选择】这三个参数,创建了默认 SQL 事务对象,并将其返回。因为由上面代码可知的第三个形参传了 false 进来,所以没有自动提交,则需要自己调用 sqlSession.commit() 。
 private SqlSession openSessionFromDataSource(ExecutorType execType, TransactionIsolationLevel level, boolean autoCommit) {
    Transaction tx = null;
    try {
      final Environment environment = configuration.getEnvironment();
      final TransactionFactory transactionFactory = getTransactionFactoryFromEnvironment(environment);
      tx = transactionFactory.newTransaction(environment.getDataSource(), level, autoCommit);
      final Executor executor = configuration.newExecutor(tx, execType);
      return new DefaultSqlSession(configuration, executor, autoCommit);
    } catch (Exception e) {
      closeTransaction(tx); // may have fetched a connection so lets call close()
      throw ExceptionFactory.wrapException("Error opening session.  Cause: " + e, e);
    } finally {
      ErrorContext.instance().reset();
    }
  }
1.8.3 增删改的执行
之前使用了 sqlSession.insert("insertStudent", student); 这个语句,对于 SqlSession 的
- insert( String statement, Object parameter )
- delete( String statement, Object parameter )
- update( String statement ) 方法
其底层均是调用执行了 update( String statement, Object parameter ) 双参数方法。
跟进 update 双参数方法 第 19 ~ 28 行中,
第 21 行将 dirty 这个变量设为 true;
第 22 行中调用 configuration 对象的 getMappedStatement(statement) 方法,这个方法是根据形参即 映射文件中 Sql 的 id 名字 ,在映射文件中获取到了 sql 执行语句;
并在第 23 行中使用 executor 执行器对象来执行更新语句。
DefaultSqlSession.class:
public class DefaultSqlSession implements SqlSession {

  @Override
  public int insert(String statement, Object parameter) {
    return update(statement, parameter);
  }

  @Override
  public int update(String statement) {
    return update(statement, null);
  }

  @Override
  public int delete(String statement, Object parameter) {
    return update(statement, parameter);
  }

  @Override
  public int update(String statement, Object parameter) {
    try {
      dirty = true;
      MappedStatement ms = configuration.getMappedStatement(statement);
      return executor.update(ms, wrapCollection(parameter));
    } catch (Exception e) {
      throw ExceptionFactory.wrapException("Error updating database.  Cause: " + e, e);
    } finally {
      ErrorContext.instance().reset();
    }
  }
}
1.8.4 SqlSession 的提交
在之前使用了 sqlSession.commit() 这个语句;
根据第 3 ~ 5 行源码可知,本质就是调用了 commit(false) 这个方法。
在第 10 行中需要跟进 isCommitOrRollbackRequired(force) 这个方法。这个方法的源码在 19 至 21 行。其返回了一个逻辑语句的布尔值。
- 在 1.8.2 可知 autoCommit 是 false;所以 !autoCommit 是 true;
- 根据 1.8.3 可知在执行插入语句后,dirty 是 true;
- 所以该方法返回的是 true
已知执行 executor.commit(true) 语句;
- 继续跟进到 BaseExecutor.class 里,在该类代码的第 11 行可以看见事务的提交。
在 11 行中,因为提交了事务,数据库数据同步了,所以 dirty 就改成了 false。
DefaultSqlSession.class:
public class DefaultSqlSession implements SqlSession {
  @Override
  public void commit() {
    commit(false);
  }

  @Override
  public void commit(boolean force) {
    try {
      executor.commit(isCommitOrRollbackRequired(force));
      dirty = false;
    } catch (Exception e) {
      throw ExceptionFactory.wrapException("Error committing transaction.  Cause: " + e, e);
    } finally {
      ErrorContext.instance().reset();
    }
  }

  private boolean isCommitOrRollbackRequired(boolean force) {
    return (!autoCommit && dirty) || force;
  }
}
BaseExecutor.class:
public abstract class BaseExecutor implements Executor {

  @Override
  public void commit(boolean required) throws SQLException {
    if (closed) {
      throw new ExecutorException("Cannot commit, transaction is already closed");
    }
    clearLocalCache();
    flushStatements();
    if (required) {
      transaction.commit();
    }
  }
}
1.8.5 SqlSession 的关闭
之前在 finally 块中使用 sqlSession.close() 这个语句,这个语句依旧是 DefaultSqlSession 类的一个方法。
- 第 6 行,执行了 isCommitOrRollbackRequired(force) 这个方法
- !autoCommit 根据上面可知是 true
- 因为 1.8.4 执行了事务的提交并将 dirty 改成了 false,所以 (!autoCommit && dirty) 为 false
- 根据第 6 行传进来的值为 false,所以 (!autoCommit && dirty) || force = false || false = false,最后结果为 false
- 第 10 行为事务的关闭,第 17 ~ 21 行释放各种资源并将关闭标记置为 true。
public class DefaultSqlSession implements SqlSession {

  @Override
  public void close() {
    try {
      executor.close(isCommitOrRollbackRequired(false));
      closeCursors();
      dirty = false;
    } finally {
      ErrorContext.instance().reset();
    }
  }

   private boolean isCommitOrRollbackRequired(boolean force) {
    return (!autoCommit && dirty) || force;
  }
}
BaseExecutor.class:
- 现在跟进第 6 行的 executor.close( isCommitOrRollbackRequired(false) )
- 在 BaseExecutor 类的代码的第 7 行执行 rollback( forceRollback ) 方法,forceRollback 的值为 false。该方法代码在 25 ~ 37 行,在该方法的第 31 ~ 34 行的 finally 块中,因为传进来的参数为 false,即 required 为 false,所以不执行事务回滚。
- 若没有 1.8.4 SqlSession 的提交,则 dirty 这个变量为 true;则 isCommitOrRollbackRequired(boolean force) 这个方法将返回 true,最后会执行事务回滚。
public abstract class BaseExecutor implements Executor {

  @Override
  public void close(boolean forceRollback) {
    try {
      try {
        rollback(forceRollback);
      } finally {
        if (transaction != null) {
          transaction.close();
        }
      }
    } catch (SQLException e) {
      // Ignore. There's nothing that can be done at this point.
      log.warn("Unexpected exception on closing transaction.  Cause: " + e);
    } finally {
      transaction = null;
      deferredLoads = null;
      localCache = null;
      localOutputParameterCache = null;
      closed = true;
    }
  }

  @Override
  public void rollback(boolean required) throws SQLException {
    if (!closed) {
      try {
        clearLocalCache();
        flushStatements(true);
      } finally {
        if (required) {
          transaction.rollback();
        }
      }
    }
  }
}
1.9 别名
在一个映射文件一般对应数据库的一个表和一个 bean 对象。所以可以在使用缩写来表示,这样更简洁,不过需要修改配置文件。
<!-- 原始写法  -->
<insert id="insertStudent" parameterType="com.hahg.beans.Student">

<!-- 第一种改法 -->
<insert id="insertStudent" parameterType="Student">
<!-- 第二种改法 -->
<insert id="insertStudent">
配置文件修改成以下代码,使用 <package/> 标签。使用该标签会将该包中所有实体类的简单类名指定为别名,写法简单方便。
<!-- 注册配置文件 -->
	<properties resource="jdbc.properties" />

	<settings>
		<setting name="logImpl" value="LOG4J2" />
	</settings>

<!-- 增加下面的代码 -->
	<typeAliases>
		<package name="com.hahg.beans" />
	</typeAliases>
也可以通过 <typeAlias/> 标签一个个指定别名,好处是可以任意指定别名。坏处是必须逐个指定,比较繁琐。
<typeAliases>
		<typeAlias type="com.hahg.beans.Student" alias="Student" />
</typeAliases>